Rytm has a burned LCD

1 Like

Add my Rytm to the lot… :-/ IMG_20191114_115926|375x500

Adjusting the contrast trimmer fixed my former shady Rytm display, too. :+1:

1 Like

Ehy motone can you help me understand which is the contrast trimmer please?

Thanks a lot man

1 Like

The adjustment of the contrast has in my case fixed the pixel interference.
And it’s not necassary to take the boards apart completly.

1. Disconnect the unit from the power supply!
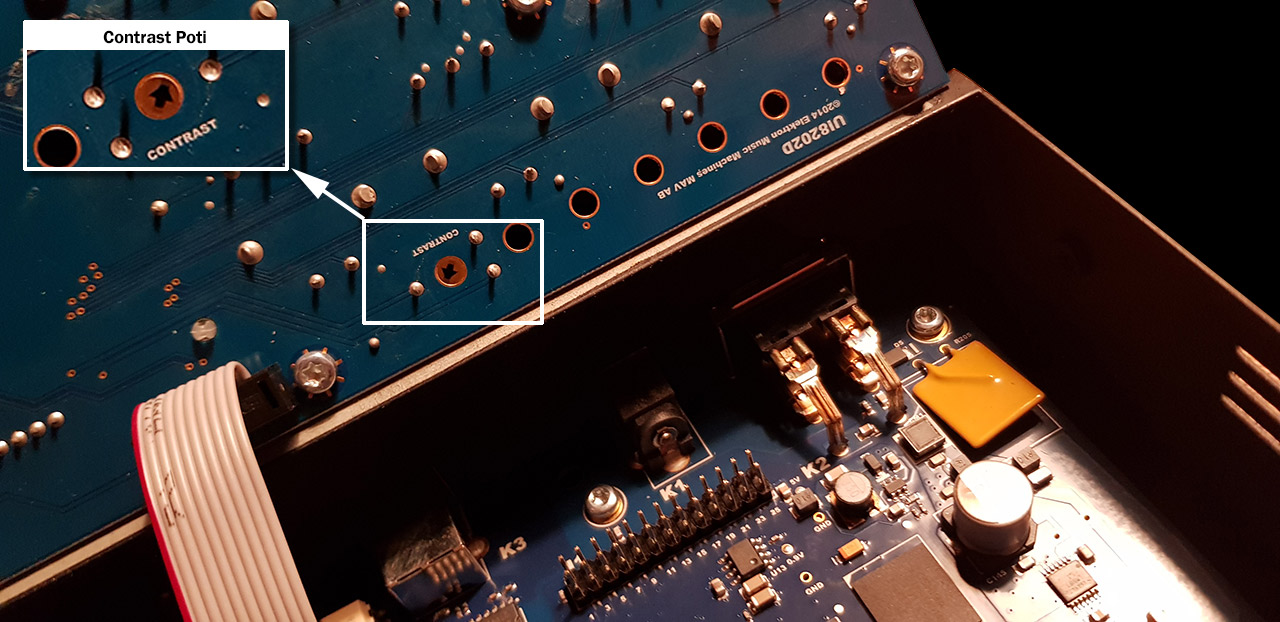
2. Remove the front panel and on the back you will find the inscription: Contrast.
3. Now you can adjust the Contrast poti very carefully from behind with a fine screwdriver.
4. Then reassemble, switch on and test.

11 Likes

I’m currently having this same exact issue on a used Analog Four mk1 I bought. It’s in almost the same exact spot, on the right side, hardly a coincidence IMO. I doubt it’s still under warranty, I wonder how much it will cost me to send it back (and how long it will be gone).

My display looked really bad. Ordered already a replacement display from Elektron. Tried the contrast adjustment first although I did not think it could save it, but it totally did!

1 Like

Thanks, it helped me too :smiley:

1 Like

Yes, adjust the Trim for contrast andyou are done. Did this on my a4 two days ago. Perfect!

1 Like

Will this work on an Analog Four MK1 perhaps?

I was already scheduling the support with Elektron…

to my delight I tried to open the unit and realized I managed to remove exactly ONE of the screws as all the others were properly “damaged” or torn, showing that the previous owner (got used) already been there, and didn’t have the appropriate key…

edit: opened it up and no visible contrast trimmer. not feeling like taking the internal board off

You have to dislocate the frontplate from the upper board. The trimmer is right beside the lcd. Are these screws washed out? If they are not too heavy screwed in, you can try a plier maybe?

I managed to open it, but I found no trimmer… I don’t have access to the LCD unless I remove internal screws and I’m a bit afraid of messing the buttons if I do that…there’s an internal board that squeezes the buttons and the lcd screen in the A4. Should I just unplug the internal board too?IMG_7013 (2) photo on proper angle

Yes, i did this a few days ago by standing the open a4 like yours on the side / vertical. so i could let the board plugged in and unscrew the board from the faceplate without something crashing. Quite easy. no fear, just unscrew, put the faceplate apart and adjust the trimmer (i did adjusting while the a4 was powered so i can see the effect on the display - be careful and don´t touch anything inside)

I just tried it and the internal screws are really tight. I’ll get some Philips connectors for my electronic screwdriver and I’ll report back in a few days…

Meanwhile I’ll leave it on. I noticed that in Test Mode the display seems to be trying to expand to the area that is blank on the LCD test and I might leave it there for a few hours… Mine has been sleeping for 2 years before this problem lol.

I opened it up and no trimmers on the inside back of the board… only twi tips at the side of the LCD, are those the trimmers?
edit: found it… I messed so much with the tips at the right, I hope I didn’t damage anything. the contrast pot is at the bottom left of the picture. display is not 100%, there is some colour difference, but I guess I’m gonna save the shipping to Sweden… thanks alot

2 Likes

Done and working fine!!! Thanks!

2 Likes

My AR mk1 display also developed severe discoloration on the right side.
Will open it tonight and try to adjust the contrast trimmer, hopefully this should do it.
If that can’t solve the issue will just order a replacement from Elektron along with some encoders to fix my OT.

1 Like

I have the same problem… @Skope could you report the result?

Thx so far

It’s like new… adjusted the contrast trimmer to max (all pixels black) and then slowly turning it back…no more LCD shadows.

And since got it opened also fixed the pads.

Thanks everyone and happy new year.

2 Likes