Just create multiple midi tracks on the force and daisy chain the midi sends, tapping the output of each midi channel to go wherever… Force synth or midi output whether by Force minijack midi outs or attached USB midi devices.
That’s right, MIDI monitor on the Force are either Off/In/Auto/Merge. So it’s doable but a bit cumbersome. Maybe he can create a template project with all the settings ready to go.
That is exactly what I’ve opted for… A master template with all my hardware devices mapped and ready to go, plus extra midi channels to ‘tap’ midi from any (most!) of my input devices to go to DAW PC or iPad or other hardware sequencers. Once it’s setup and routed you don’t need to do it again. Backup often.
Templates sure are handy.
Quick question - when the Knobs are in MIDI mode, knobs 9-16 are mapped as ‘SND CONTROL 1-8’. Do you know what this is for?
Thanks! Do I understand it correctly that I have to create a template with up to 16 MIDI tracks with settings like “receive MIDI on channel 1, transmit MIDI on channel 1”?
I’m not sure - good question!
Yes - I have a load of midi tracks setup in my template that just deal with midi routing. E.g to get midi from my Force (or midi input devices via the Force) into my iPad, I have 16 midi tracks off to the right of my main tracks.
Then I use the midi send from a midi track on the Force to get the midi to them.
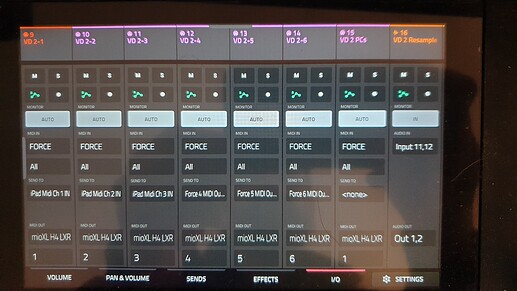
In the screenshot below you’ll see 6 midi tracks for the 6 parts of my #2 Volca Drum (VD) on midi channels 1-6, a 7th midi track for program change messages and and 8th audio track for resampling.
Each VD track is going out to my VD (in my case via my LXR drum machine as a USB Hosted device on the MioXL), but also VD tracks 1-3 are getting sent to the iPad tracks shown below:
There are a pair of midi tracks for each midi channel I want to access on the iPad. One is OUT to iPad, the other is back IN from the iPad (I use Mosaic on the iPad to achieve chromatic play via note->CC conversion and the IN track returns my newly generated CC data and merges it back to my VD along with the note data to ‘play’ it chromatically).
You’ll see I’m also sending midi again from the iPad tracks to the Force’s built in midi output via yet more additional midi tracks (not shown)… This is to get the midi to my DAW PC via yet another midi route for midi multi tracking to DAW and Force at the same time, capturing both the note data (from iPad IN track or directly from the source midi track) and CC data (from iPad OUT track).
Or just the midi data directly from the main track(s) - see the VD tracks 4-6 in the first photo which are sending just to the Force’s midi output via yet more additional midi tracks in my template (not shown) - not via the iPad tracks - in this example I’m only using VD tracks 1-3 for chromatic play via the iPad midi processing.
Hey people,
I want to clarify one thing that I’m not completely sure of: In what cases do you use Warping vs Time stretch? Am I correct if I use Warping to bind sample to the tempo so that whenever I change tempo the sample automatically stretched without changing the pitch and Time stretch is one time operation to do the same as warping but for exact BPM for which you stretched the sample. So Warping is the process that automatically matches the sample to BPM with worse quality, whenever you change BPM, Time stretch on the other hand is manual and uses better algorithm and it affects the sample once the Time stretch is done. I just need to get what is the point of having two things. Say Ableton is warping when you need it and it’s called warp. In the Force you have both Warp and Time stretch. So please clarify…
Ok, then I get it almost right
thank you for the reply!
Also know that there are 2 different Warps in the Force/MPC. A basic lower quality & more processor hungry 1. Many users complain about both as being crappy compared to what else is available in 2023, but I like to use it because it adda nasty sound artifacts to the sample that no other features on the device can. Have BPM sync on & mess with the BPM & stretch parameters. If your even into that kinda of stuff. Still hope they do ads a better Warp but still keep the current versions.
While Elek_dude_98 is mostly correct, there is a difference on Force between “warping” and time stretching. Warping is done in real-time and limited to Force’s warp algorithm - and even the best quality choice (which is “Pro Ten” at the time of this post), it suffers from audio artifacts pretty noticeably, especially in low frequency stuff and especially when you +/- more than a few BPM from the actual BPM.
Time-stretch on Force is rendered as an offline process and uses a much higher quality algorithm, hence why it sucks up the SoC CPU resources. So if quality is your goal, do time-stretching (such as when you are sample editing). If on-the-fly tempo matching is your goal (at the expense of sound quality), then warping is your best (only) bet.
This is from the manual page 326. You can also type Warp in the manuals own search engine. Which is what I did to find this:
"The Warp feature lengthens or shortens a region of an audio track or sample without changing its pitch. This enables you to fit the length of an audio track or sample to the length of a clip, a bar in your clip, etc. while maintaining its original key.
Please note that the Warp algorithms are very CPU-intensive and can result in audio drop-outs during playback if used too freely. Be mindful of how (and how often) you use the warp function. You can reduce the CPU resources required by doing any/all of the following:
Minimize the amount of pitch adjustment of warped audio. In Track Edit Mode, avoid using extreme Stretch values. Avoid warping very small audio regions.
Warp as few tracks or track regions as possible (i.e., reduce the number of total number of voices of the polyphonic limit that use the Warp algorithm at a given time), especially instances where the warped regions start at the same time.
Avoid rapidly triggering samples that are warped.
If you have warped samples used in a drum track or keygroup track, consider using the Flatten Pad function to consolidate the affected pad’s layers into one audio sample. After you flatten the pad, its sample/samples no longer need to be warped."
Oh that’s useful info! tThanks!
Yes this i what I was thinking of
A useful feature some may had overlooked on the Force.
Akai Force: Beginners Guides to Merge Pads - By Nicethings Who now works for Akai & cool dude on Gearspace.com Force thread.
Damn the Force makes half a decade in 2024. Time moves slow when you’re jamming!
This guy had some cool workflow tips.
https://www.youtube.com/watch?v=9eE_V5P3lXI
I didn’t know NiceThings ended up working for Akai. That’s awesome. I always appreciated his Force videos. Great dude.
Yeah really cool dude. He talk about on one of the last videos on his page. He still checks in at gearspace sometimes but he can’t say much directly. I don’t think Akai is done with the Force just yet, but time will tell…
Don’t sleep on Akai FXs!
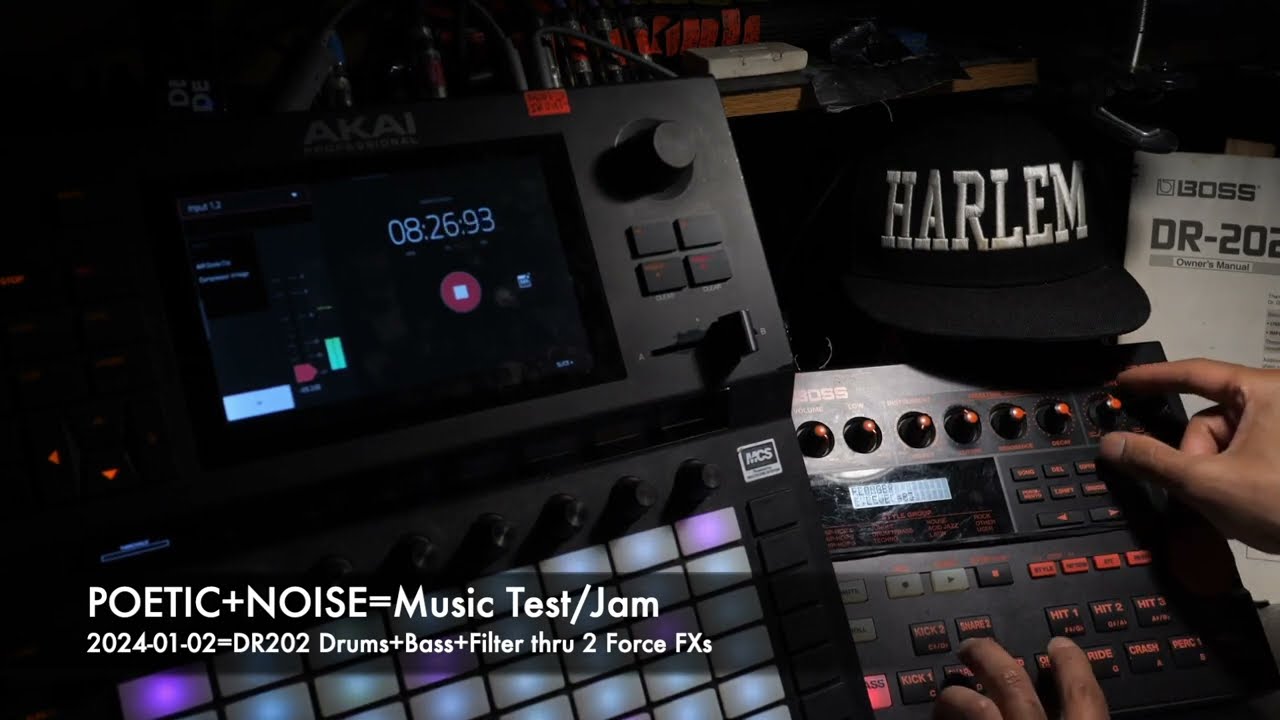
For my first YouTube video, I’m just testing out the 26 year old, Boss DR-202 sounds & filter with the Force FXs. The 202 got a grumpy-ass filter & that’s why it dope! In the last 25 seconds you hear DR202 without the Force 2 FXs…not so dope!
I couldn’t get the 2 to MIDI up in the way a liked. There’s no CC# for the DR202 Cutoff knob. I might be overlooking something, but I just recorded jam right into the Force sampler just to test the filter out, I didn’t mean to go in for 10mins. No MIDI seq data, so it’s a 1 time kinda thing.
https://www.youtube.com/watch?v=AbsfEx8ApU4
Here’s a text file of Force Hotkeys. I found it first somewhere online, but many shortcuts were missing, so I edited the hell out of it. Enjoy!
[LIST=1]
AKAI FORCE
BUTTON SHORTCUT’s= FUNCTION
Edit + Assign A/B= Crossfader Edit screen.
Edit + Knob 1-8= Knobs Macro screen.
Edit + Knobs button= Macro page.
Edit + Pad= Clip settings: set name, color, launch quantization, Launch mode (Toggle/Trigger) Program Change (From track/clip)
Edit + Scene Launch= Edit Row Options: Insert 1 or 8 Rows, Insert & Capture (copies any active clips to a new Scene, Clear, Take Snapshot.
Edit + a Track button or Double tap the Track header (the top box on the screen that has the track name & number)= Track Editor
Shift + Double tap a Track button= Track setting: name, track/pads colors, transpose, & MIDI settings.
Shift + ARP= Arpeggiator & Note Repeat Settings.
Shift + Clear Automation (Button under Track 4)= Clears all automation on that track.
Shift + Clip /Edit + Track button= Edit Track (like program edit; not available for audio tracks)
Shift + Cursor Buttons: Left, Right, Up or Down= Matrix jumps to next 8 tracks.
Shift + Data Dial= Fine Adjustments parameters values.
Shift + Double (Bottom under Track 3)= Double Clip Length.
Shift + Edit + Pad= Convert a drum pad to keygroup program.
Shift + Knobs= 1 of the 4 Banks of Pad Grid in the Macro section.
Shift + Launch (while in Launch Mode)= Launch Config settings: Default bar lenght, Empty Slot Off/Dim, Tapping a clip selects it (Play notes on one track while launching clips on another won’t automatically change tracks), Show arrangement in clip matrix
Shift + Matrix= Ableton Live Control.
Shift + Menu= Open up the last selected Prefernce Tab.
Shift + Metronome (Bottom under Track 5)= Metronome Settings.
Shift + Mixer= Open Pad Mixer on Drum.
Shift + Mute/Solo/Rec Arm/Clip Stop= Mixer Config settings.
Shift + Navigate= XYFX Settings.
Shift + Note (while on a Drum Track)= Note Config options: pad Velocity Levels (As played, 12-93%, Half, Full)
Shift + Note (while on a Non-Drum Track)= Note Config options: Types; Note Modes, Root Note, Octave, Scale, Velocity Levels, Filter Input, Pads Generate Aftertouch.
Shift + Play= Play from where the seq was stopped.
Shift +(Oct -/Oct +)= Change Drum Pad Bank/Note octaves.
Shift + Rec= Record to Arrangement.
Shift + Save= Saves to the Project.
Shift + Step Seq= Step Seq Config options: Mode (Drum, Melodic, Lanes, Mono Steps 8x4, 8x8), Velocity, Step Size & Pads Generate Aftertouch.
Shift + Tap Tempo= Set BPM/Tempo.
Shift + Undo= Redo.
Press Step Seq= Cycles thru the different modes: Drum, Melodic, Lanes, Mono Steps 8x4, 8x8.
Hold any of these buttons: Clip/Launch/Knobs/Menu/Matrix/Mixer/Note/Rec/Step-Seq/Tap Tempo (release to return to previous view)= Quickly view that button’s window with the ability to edit it. Then jump back to last screen.
Delete + Pad(s)= Will deletes the note(s) of that pad(s) as it plays in a seq while on that Track
Delete + Mute/Solo/Arm= Popup screen with the option to clear Mute/Sole/Arm on all tracks. You’'ll have to be in Pad view to clear Mutes/Solos for pads.
Delete + A/B= Clears A/B Assignments.
Hold Assign A/B= Quickly assigns a parameter to the Crossfader.
Press and hold an insert FX slot on the mixers insert page.= Quickly add a channel strip.
MIDI Learn (while in Track Edit’s Edit-All mode)= Assigns all 128 pads to the Macro: Knob, Crossfader A/B, XYFX, Pad Grid, & ENV Followers with the MIDI Learned parameter.
Long press a blank Track select button= Quickly add a track.
Hold Launch + Pads (while in Launch mode)= Move Tracks by 8 sections. The pad under Knob#1 takes you to Tracks 1-8 on row 1. The next pad goes to Tracks 9-16. The last pad under Knob#8 goes to Tracks 57-64. The 8 pads on the next Rows goes to lower Scenes on the Matrix - if you made more than 8. You just to play it this feature to get how it works. It even works while your in other window like Navigate - where you can really see in action if you got a lot of tracks & clips.
While in the browser, select a clip slot or drum pad. while looking at a list of samples, press the + and - buttons to load the next / previous in the list= Load samples/clips, overwritten sample is automatically cleared out of memory.[/LIST]


![Powerful Live Set: Akai Force Setup for Live performance [TUTORIAL] [TECHNO]](https://img.youtube.com/vi/9eE_V5P3lXI/maxresdefault.jpg)
